TROUBLESHOOTING + AFTERCARE
have questions? we’re here to help.
Cleaning Fresh Piercings
The best way to clean your piercing is to rinse it thoroughly under a direct stream of warm running water. Yes, that’s really it. We recommend doing this at the end of your daily shower, which allows the steam to soften any debris or “crusties” that may have built up on the jewelry and makes it super easy to rinse away. Be sure to pay extra attention to drying the piercing thoroughly on the front and the back, and attempt to keep wet hair off of it with bobby pins or by tying it up. You can use either a blow dryer on the cool setting or a clean paper towel to dry your piercing, but be sure to pat, don’t wipe. Excess moisture is a major cause of irritation, so never skip drying. Avoid getting any kind of soap or moisturizer on your piercing.
What to Expect
Crusty build up, some on and off bleeding, itching, redness, swelling, and dryness are all normal parts of healing. Removing your jewelry can cause it to close IMMEDIATELY, so keep your jewelry in unless you’re ready to permanently retire that piercing. Even fully healed piercings begin to shrink within minutes. You do not need to remove the jewelry to clean anything.
We expect the area to remain swollen for several weeks, and we recommend having shorter jewelry put in most piercings a few weeks to a few months after being pierced. This is called a downsize. Not all piercings need to be downsized, but if there’s extra space on your posts, be sure to set up a downsize appointment ASAP.
Fresh piercings heal from the outside in, so remember, it takes a lot longer for piercings to heal than it may appear from the outside. Everyone’s body will heal differently and it can take upwards of a full year for all of the damaged cells to fully regenerate and form a completely healed piercing channel, and complications can arise at any point during that process, so be patient, diligent, and always reach out if something feels off or you have any questions or concerns.
What to Avoid
-Don’t touch your piercing! Don’t twist it, play with it, or pick stuff off of it. This is the number one cause of complications and irritation.
-Don’t sleep on your piercing. This can cause major irritation and migration. For ear piercings, a travel or hemorrhoid pillow can be a great solution if you’re a side sleeper, as sleeping with your ear in the hole will relieve all of that pressure and help protect your piercings!
-Do not submerge your piercing in any body of water, pool, or bathtub for a minimum of eight weeks. This will expose your piercing to a ton of bacteria, putting you at risk for major infection.
-Do not use alcohol, peroxide, tea tree oil, or any sort of ointments. This will all cause severe irritation and can even result in chemical burns.
-Do not change your jewelry prior to your piercer’s recommendation.
-Avoid q-tips, cotton balls, or anything that may leave fibers behind. These can get tangled on the piercing and even find their way inside the piercing channel, which is super uncomfortable and causes a lot of irritation.
-Don’t listen to your friends. We know they mean well, but there is a huge amount of misinformation about body piercing floating around out there, and unfortunately it’s uncommon for someone to have accurate information unless they are a reputable body piercer. If you have any questions at all, please reach out either by phone during business hours or by email at pierceme@cowpok.com for assistance.
Hopefully this helps clear some things up and ease your mind, but if you still need help, please book an appointment for us to check out your piercing in person! We recommend booking this service as a jewelry change, which allows roughly ten minutes for a piercer to chat with you about what’s going on, totally free of charge. That being said, we never, ever turn away emergent situations (such as unexpected severe swelling or embedded jewelry) at our door, so if you’re in pain and need urgent assistance, please just come right in at your earliest convenience so we can help you out any time between noon and six Monday through Saturday.
Troubleshooting for Piercings
Every body, immune system, and piercing experience is going to vary pretty significantly from person to person. Bumps in the road (no pun intended) when healing your fresh piercing are relatively common due to both human nature and the fact that most piercings take upwards of a full year to fully heal on a cellular level, which is a long time to be babying a healing wound! So let’s start this review with a deep breath. Remember that irritation bumps and other piercing problems are nothing to panic over or be embarrassed over, and are something most people will have to deal with at some point or another in their piercing journeys, as frustrating and unsightly as they can be in the moment. This page is going to cover the most common complications and some potential solutions, however keep in mind that the best way to get answers about your particular situation is to meet with your piercer in person to discuss what’s going on in depth.
Swelling
Whenever we perform a fresh piercing, we install jewelry that’s a little on the lengthy side to accommodate for swelling, which occurs to some degree in every piercing. After the swelling has subsided, we have you come back in for a downsize to get a shorter post that will fit nice and snug.
This is unfortunately not an exact science and every once in a while we encounter excessive swelling that surpasses the typical amount of extra wiggle room we give. This can be really uncomfortable and should be dealt with ASAP before it gets worse or jewelry becomes embedded, so don’t wait for this to subside at home, come into the studio ASAP so we can install longer jewelry for you. You do not need an appointment for this. In the meantime, a cold compress and over the counter anti inflammatories can be helpful to control the swelling.
Keloids vs. Irritation bumps
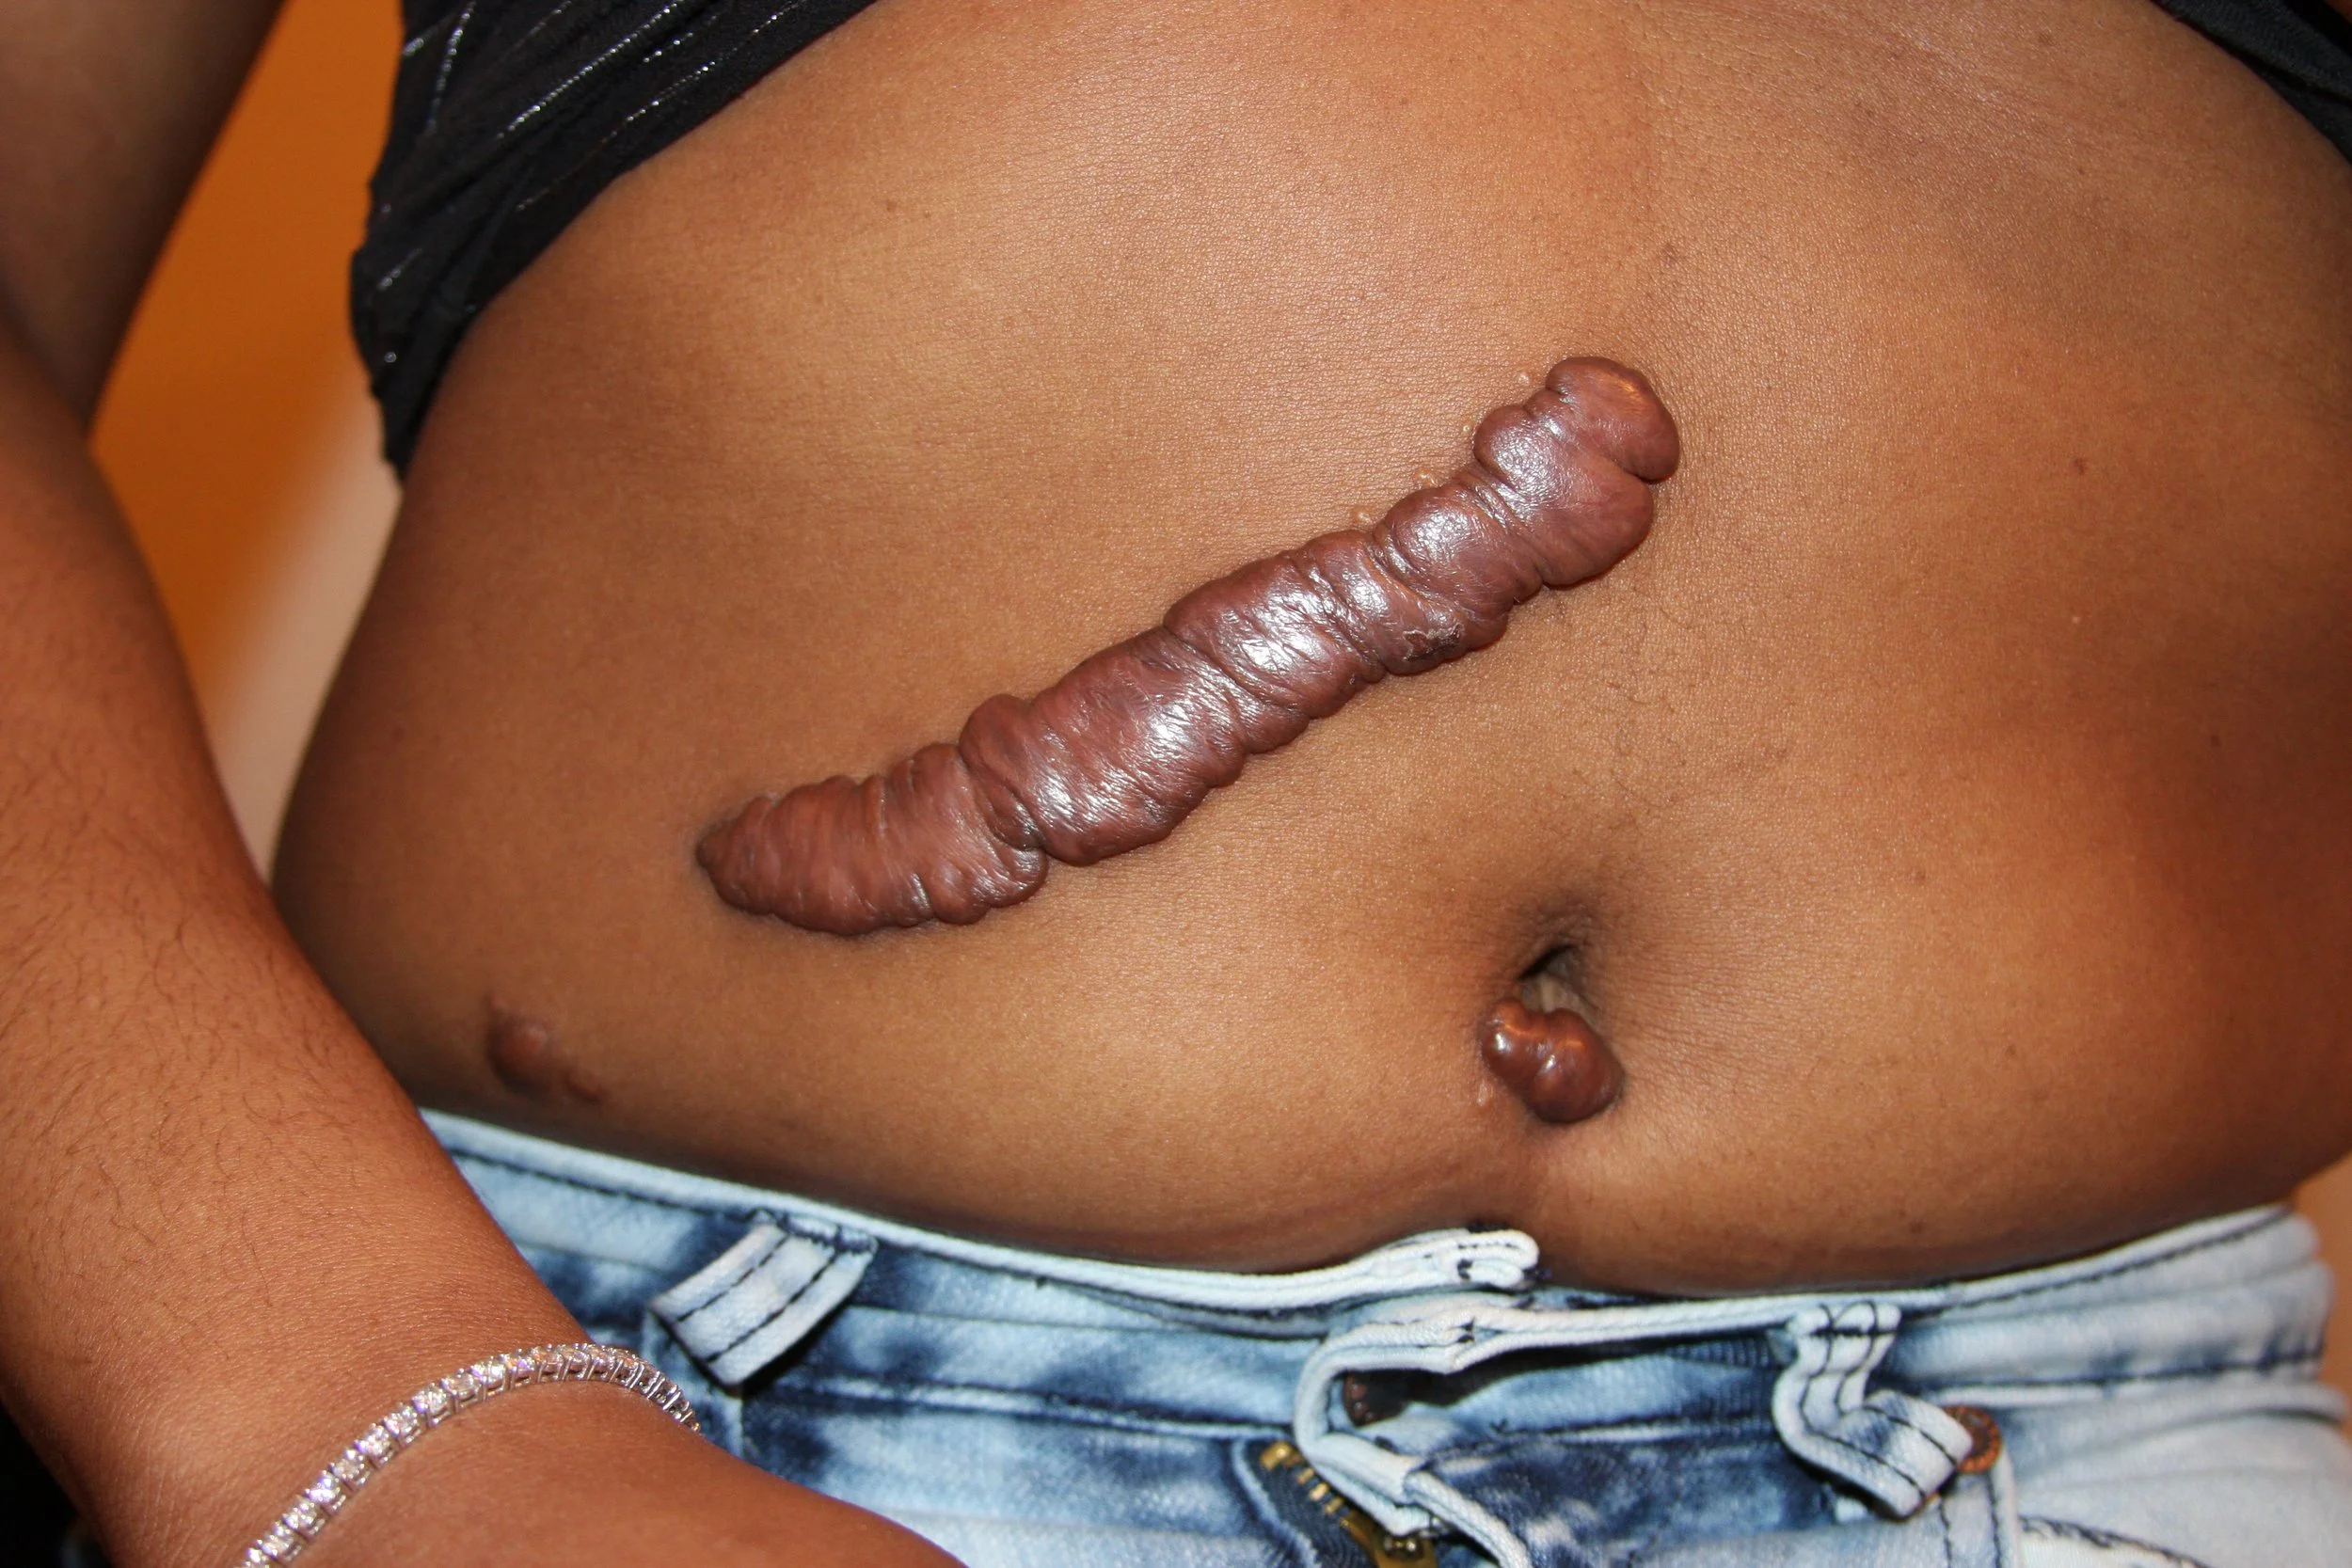
An example of genuine keloids formed on scarring. Source: Wikipedia
The most common irritation bump misconception is that keloids and irritation bumps are the same thing, when in reality they’re drastically different with completely different strategies for treatment. Keloids are part of a genetic medical condition that causes puffy, raised scarring or large bumps on any wound that would typically leave a scar. This would be generalized across all or most wounds on your whole body throughout your life, not just piercings, so you would almost certainly know by the time you’re of piercing age if you or your family members were prone to keloids. Keloids are typically large, rubbery in texture, and shiny, and the only way to get rid of them is to visit a dermatologist for injections or surgery. Unfortunately there is nothing we as piercers can do to prevent or treat keloids, so if you suspect that you have a keloid, please reach out to your dermatologist for diagnosis and treatment.
The good news is that 99% of the time when people think they have a keloid, it’s actually the common irritation bump, which is essentially a buildup of swelling and displaced tissue caused by irritation in a piercing channel. Once the source of the irritation is removed, the bump is typically soon to follow, making them much, much easier to deal with than genuine keloids.
So, it’s an irritation bump. What do I do now?
Irritation bumps are caused by irritation (naturally), and irritation can be caused by a whole bunch of things when a piercing is healing. Some of these things, like hormonal changes, immune responses to illness or stress, or rapid changes in weather are outside of your control and may resolve themselves over time. There are some other common irritants in your control that you’ll want to make sure you rule out first though:
Moisture - You should keep healing piercings as dry as possible during healing. When we see irritation bumps underneath large pieces of jewelry or behind the ears, it’s often due to excess moisture either from wet hair sitting on it for extended periods of time or just not drying thoroughly enough. After showers or compresses, you’ll want to pay extra attention to drying the front, back, and underneath the jewelry. Our favorite method for this is a blow dryer on the cool setting, or a clean paper towel also works great as long as you’re gentle and pat, don’t wipe. Avoid using cloth towels around your piercing as they’re more likely to snag on your jewelry, resulting in more irritation and sometimes even lost jewelry. Never use cotton swabs or pads, they’ll leave fibers behind that end up getting tangled in the piercing channel. It’s also imperative that you keep fresh piercings out of pools, lakes, oceans, and hot tubs for a minimum of 6-8 weeks.
Hair and Skin Products - Do not use soap. Do your very best to keep at least a dime sized area around your piercing completely clean of any lotions, oils, or hair products. If you’re finding this difficult to avoid often, a great option is either sterile saline spray or saline wipes to use after you apply any products to the area, just be sure to dry the area thoroughly afterwards as discussed above. You should never, ever treat an irritation bump with any kind of oil, soap, or ointment.
Touching/Physical Irritation - Back in the day, it was common advice to twist your jewelry so skin wouldn’t “grow over it”, however this was actually a myth born from low quality, ill fitting jewelry and in reality you should never touch, twist, play with, or pick stuff off of your piercings. You should also avoid sleeping on your piercings and, in the case of ear piercings, avoid contact with cell phones on that side. Hands and phones are both ripe with bacteria that can cause some pretty gnarly irritation or even infection, and the jostling itself will also cause irritation. Travel or hemorrhoid pillows are awesome for healing ear piercings, because resting your ear in the hole will relieve all of the pressure that will irritate your piercing!
Nutrition and Hydration - We’re not doctors and we’re not nutritionists, we don’t have a piercing diet or anything like that, but piercings heal better when your body is functioning at full capacity, and drinking plenty of water and eating enough food plays a huge role in that. Stay hydrated and sparkly! Keep in mind that piercing flare ups are common when you’re sick, pregnant, or otherwise working with a strained immune system, even in well healed piercings.
Sterile Saline & Teabag Compresses
Generally speaking, the only thing we want you to do daily to your piercings are irrigate them thoroughly at least once a day and then dry them thoroughly any time they get wet. However, there are a couple of other options in our tool kit for you to utilize if that alone isn’t working for you.
Sterile saline spray - Saline spray is a great way to irrigate your piercings, especially if you find that once a day isn’t enough to keep crusties at bay or if you don’t shower daily. The salt content can be a little bit drying on the skin in our climate here in Buffalo, so be sure to dry the area off super thoroughly after using saline both to prevent excess moisture and to prevent dry skin buildup. We do not recommend mixing your own salt solution or soaking with the saline.
Warm teabag compresses - If you accidentally snag or otherwise make your new piercing angry, warm tea bag compresses can help speed up the healing process to get you back on the right track. You can use most types of tea, but we recommend a basic black tea. All you need to do is make a cup of hot tea like you normally would, remove the tea bag, let it cool down enough that you don’t burn yourself, and then gently hold it on your piercing until it gets cold. The antioxidants and caffeine are both beneficial to wound healing, and doing warm compresses helps increase blood flow to the area. For the most consistent results, you should do a warm tea bag compress at least once a day for two weeks. Don’t forget to dry the area thoroughly after doing compresses, otherwise you may accidentally create more irritation from moisture.